If your site isn’t showing up in search results the way you’d expect, the problem often isn’t your content; it’s something happening behind the scenes. A technical SEO audit is how you find out. This guide walks you through the full process, step by step, using free tools, so you can run your own audit today even if you’ve never done one before.
What Is a Technical SEO Audit and Why It Matters
A technical SEO audit is a review of the behind-the-scenes elements of your website’s crawlability, indexing, site speed, mobile usability, and security that determine whether search engines can properly access, understand, and rank your pages. It’s different from a content audit or a backlink audit: it doesn’t ask “is this page well-written,” it asks “can Google even see and load this page correctly.”
This matters because great content on a page search engines can’t crawl or index is invisible. Technical issues are also often invisible to you as a visitor pages load fine in your browser while quietly returning errors to search engine crawlers. That’s what makes a structured audit worth doing before you invest more time in content or link building: it’s the foundation everything else sits on.
How Technical SEO Differs From On-Page SEO
Technical SEO focuses on whether search engines can access, crawl, and index your website, while on-page SEO focuses on the content and elements users see on individual pages. This includes optimizing keywords, headings, title tags, meta descriptions, images, and content structure. Both work together: even well-optimized content may struggle to perform if technical issues prevent search engines from properly accessing or understanding the page.
Tools You’ll Need
You don’t need an expensive SEO subscription to run a solid first audit. Three free tools cover almost everything a beginner needs.
Google Search Console
This is Google’s own free tool and the single most valuable resource for a technical audit. It shows you indexing status, crawl errors, mobile usability issues, and Core Web Vitals data pulled directly from real user visits to your site.
Screaming Frog (Free Tier)
Screaming Frog is a website crawler that mimics how search engine bots move through your site. The free version crawls up to 500 URLs, which is plenty for most small sites, and flags broken links, missing meta tags, duplicate content, and redirect issues in one pass.
Google PageSpeed Insights
This tool analyzes any URL and reports on load speed and Core Web Vitals, combining lab data with real-world performance data. It also gives specific, prioritized suggestions for what to fix.
Step 1: Crawl Your Site and Check Indexing
Before you can fix anything, you need a full picture of what your site actually looks like to a search engine.
Run your first crawl
Open Screaming Frog, enter your homepage URL, and start the crawl. It will work through your internal links the way a search engine would, cataloging every page it finds along with any errors. When it finishes, you’ll get a summary of issues sorted by type this is your starting map.
Check the Coverage/Indexing report in Search Console
In Google Search Console, go to the Indexing section and review the Pages report. This tells you how many of your pages are actually indexed by Google versus how many exist on your site. A big gap between the two is a signal worth investigating it usually means something is blocking pages from being indexed, whether intentionally or by mistake.
Step 2: Fix Crawlability Issues (Sitemap, Robots.txt, Redirects)
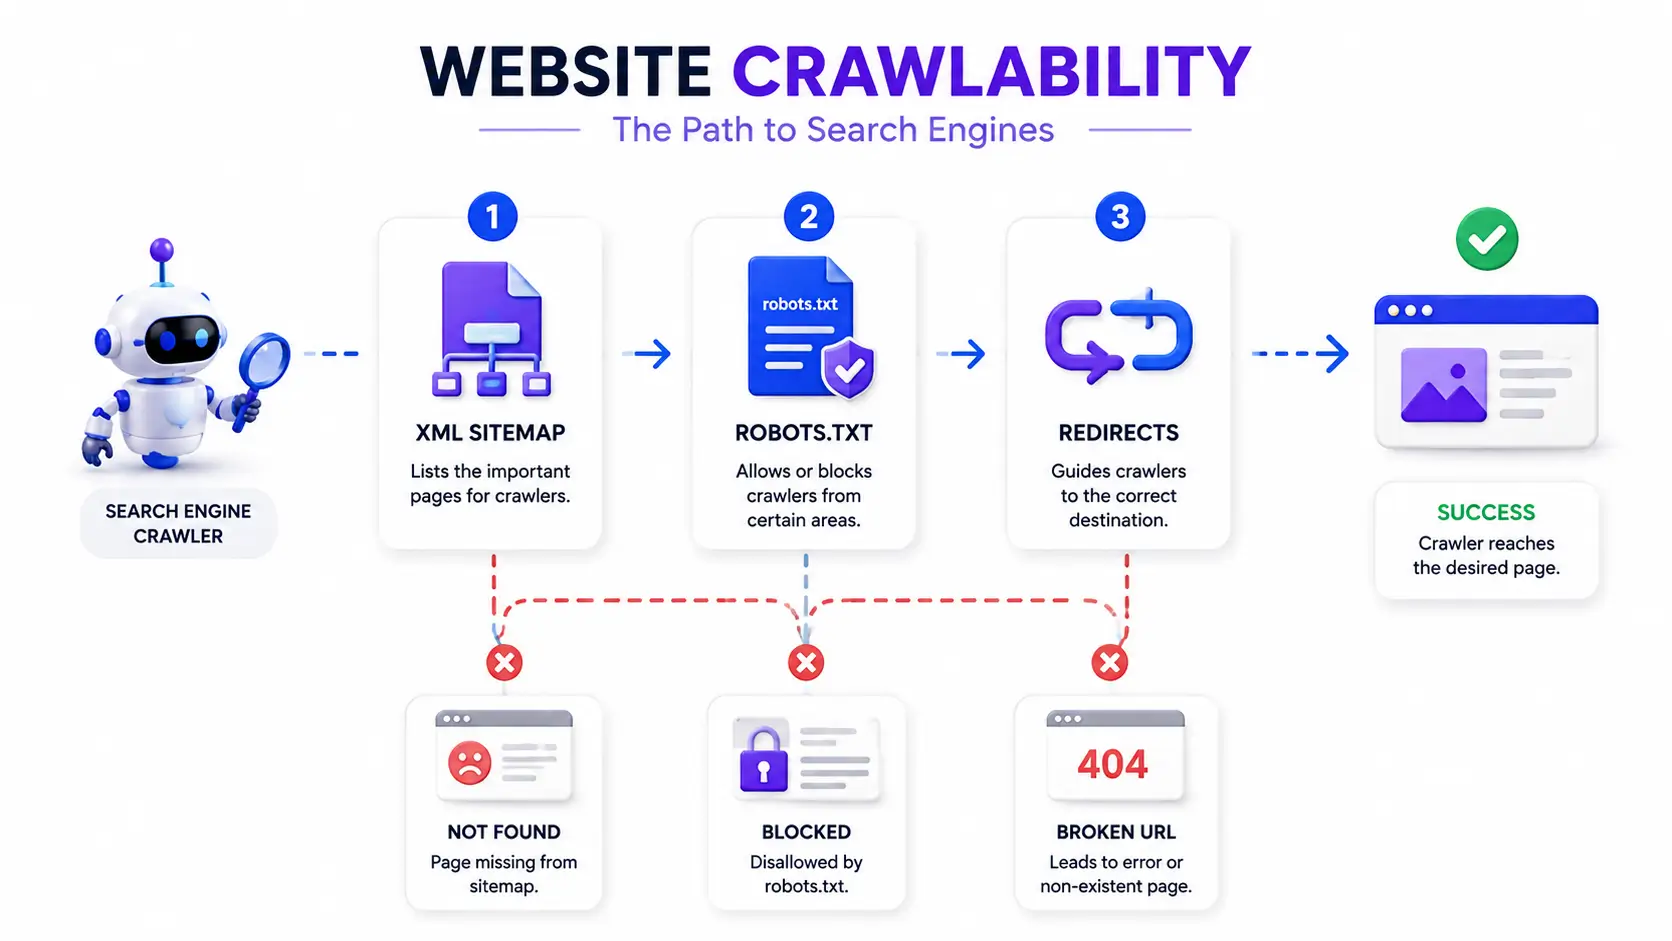
If search engines can’t crawl a page, nothing else about that page matters for SEO. This step is about clearing the path.
Review your XML sitemap
Your sitemap should list the pages you actually want indexed no more, no less. Check that it’s submitted in Search Console, that it doesn’t include broken or redirected URLs, and that it’s not missing important pages.
Check robots.txt for accidental blocks
Your robots.txt file tells search engines which parts of your site they’re allowed to crawl. It’s surprisingly common for a line meant to block a staging environment or admin folder to accidentally block an entire section of a live site. Open yours and read it line by line.
Find and fix broken links (404s) and redirect chains
Use your Screaming Frog crawl to pull a list of every 4xx and 5xx status code on your site, along with any redirect chains (a URL that redirects to another redirect, instead of straight to the final page). Fix broken internal links by updating them to the correct destination, and shorten redirect chains to a single hop wherever possible.
Step 3: Audit Site Speed and Core Web Vitals
Page speed is both a ranking factor and a direct driver of whether visitors stick around.
Run PageSpeed Insights
Test your homepage and a few of your most important pages through PageSpeed Insights. Pay attention to the three Core Web Vitals metrics: how quickly the main content loads, how quickly the page responds to interaction, and how much the layout shifts while loading. Each one has a “good,” “needs improvement,” and “poor” threshold shown directly in the report.
Common fixes: images, code, server response
The most frequent speed issues for beginners are oversized images, render-blocking CSS or JavaScript, and slow server response times. Compressing images, deferring non-critical scripts, and choosing decent hosting will resolve the majority of speed problems you’ll encounter at this stage.
Step 4: Test Mobile-Friendliness
Google indexes and ranks most sites based on their mobile version first, not desktop, so this step isn’t optional.
Mobile usability report in Search Console
Check the Mobile Usability report in Search Console for issues like text too small to read, clickable elements placed too close together, or content wider than the screen. You can also open any page in Chrome, right-click, select Inspect, and toggle the device view to see how it actually renders on a phone.
Step 5: Check for Duplicate Content and Canonical Issues
Duplicate content confuses search engines about which version of a page to rank, splitting your ranking potential across multiple URLs instead of concentrating it on one.
Look for the same content accessible at more than one URL for example, with and without a trailing slash, or with and without “www.” Every page should have a clear canonical tag pointing to the preferred version. Export your URLs and their canonical tags from Screaming Frog and compare them against your sitemap to catch mismatches.
Step 6: Review Site Architecture and Internal Linking
A logical structure helps both users and search engines understand how your pages relate to each other and which ones matter most.
Aim for a shallow structure where important pages are reachable within a few clicks from the homepage. Check that your most valuable pages receive internal links from other relevant pages on your site, and that you don’t have “orphan” pages with no internal links pointing to them at all; those are much harder for search engines to find and rank.
Step 7: Verify Structured Data (Schema Markup)
Structured data is code that helps search engines understand exactly what’s on a page a recipe, a product, an FAQ, a review and can unlock enhanced results like star ratings or FAQ dropdowns in search results.
Use Google’s Rich Results Test to check any pages where structured data would help, and confirm there are no errors or warnings. You don’t need schema markup on every page, but it’s worth adding wherever it applies.
Step 8: Confirm HTTPS and Security Basics
Security is both a trust signal for users and a confirmed ranking factor.
Confirm your entire site runs on HTTPS, not HTTP, with no mixed content warnings (pages that load some resources over an insecure connection). Check the Experience section of Search Console for any pages flagged as non-HTTPS, and make sure old HTTP URLs redirect properly to their HTTPS versions.
How to Prioritize and Fix What You Find
A full audit checklist will almost always turn up more issues than you can fix in a single afternoon. The step most guides skip is what to do with that list once you have it.
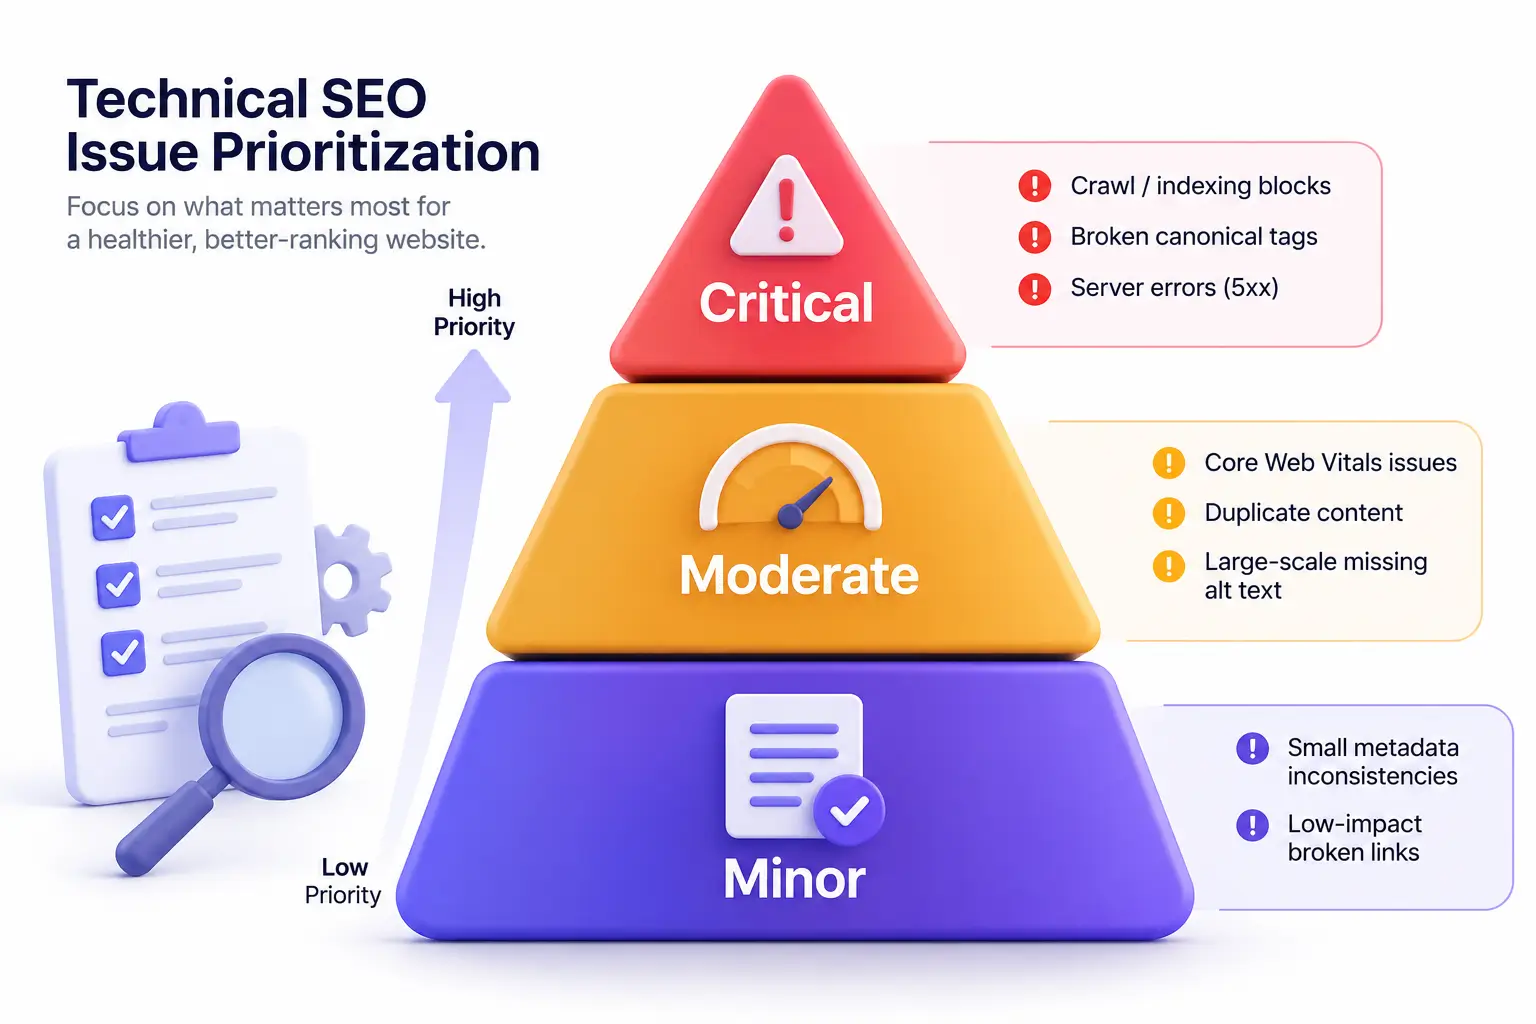
Critical vs. moderate vs. minor issues
Sort everything you find into three tiers before you start fixing:
- Critical issues that block indexing or crawling entirely: pages accidentally blocked in robots.txt, broken canonical tags, server errors on important pages. Fix these first, always.
- Moderate issues that hurt performance or rankings but don’t block access: slow Core Web Vitals scores, missing alt text at scale, thin duplicate content. Fix these next, prioritizing your highest-traffic pages.
- Minor issues with limited impact: a handful of broken links on low-traffic pages, small metadata inconsistencies. Batch these and clean them up when you have spare time.
This framework matters because not every red flag in an audit tool carries the same weight; treating a low-traffic page’s missing meta description with the same urgency as a robots.txt error blocking your whole site is how audits stall out. Working critical-to-minor keeps your effort matched to actual impact.
How Often Should You Run a Technical SEO Audit?
For most sites, a full audit once per quarter is a reasonable cadence. You should also run a targeted audit any time you make a major change: a site redesign, a CMS migration, or a large content launch since these are when technical issues are most likely to get introduced. Sites that publish very frequently benefit from lighter, more frequent crawl checks in between full audits.
It’s worth noting that technical problems are more common than most site owners assume. In a review of crawled web pages, about half showed duplicate content or indexation issues, nearly half had broken image or alt tag problems, and over a third had broken links, and none of these are visible just from browsing the site normally. That’s the core reason a periodic audit, not a one-time check, is worth building into your routine.
FAQ
What is a technical SEO audit?
A technical SEO audit is a review of a website’s backend elements crawlability, indexing, site speed, mobile usability, and security that affect how search engines access and rank pages. It’s separate from content or link-building audits and focuses purely on technical health.
Can I do a technical SEO audit myself for free?
Yes. Google Search Console, Google PageSpeed Insights, and the free tier of Screaming Frog (up to 500 URLs) cover most of what a beginner needs. Paid tools like Ahrefs or Semrush add depth but aren’t required to start.
How long does a technical SEO audit take?
For a small site under 100 pages, expect 2–4 hours for a manual audit using free tools. Larger sites with thousands of pages can take a day or more, especially when prioritizing which issues to fix first.
How often should I audit my site?
Most experts recommend a full audit quarterly, plus a targeted check after any major change a redesign, CMS migration, or large content update.
What’s the difference between technical SEO and on-page SEO?
Technical SEO covers how search engines crawl, render, and index your site (speed, structure, indexing). On-page SEO covers the content itself: keywords, headings, and meta tags on individual pages.
What are the most common technical SEO issues?
The most frequent issues are broken links, duplicate content, missing or duplicate meta tags, slow page speed, and indexation errors problems that are often invisible in a browser but block search engines from properly crawling a site.